Table of Contents
- 1. Uneven or Sunken Pavers: The First Warning Sign
- 2. Water Pooling and Drainage Problems on Your Patio
- 3. Cracks, Chips, and Joint Sand Loss
- 4. Common Paver Installation Mistakes That Cause Early Failure
- 5. How to Prevent Sinking Pavers and Shifting Joints
- 6. Paver Edge Restraint Failure: When the Border Gives Way
- 7. DIY vs. Professional Repair: What Homeowners Should Know
- Frequently Asked Questions
Last Updated: September 16, 2026
1. Uneven or Sunken Pavers: The First Warning Sign
Uneven or sunken pavers are the clearest sign of poor paver installation, and they almost always trace back to a base layer that was never built to carry the load above it. At Venice Pavers, we’ve spent over 30 years tearing out and rebuilding hardscape that failed for exactly this reason. The stones themselves were usually fine. What failed was everything underneath them.
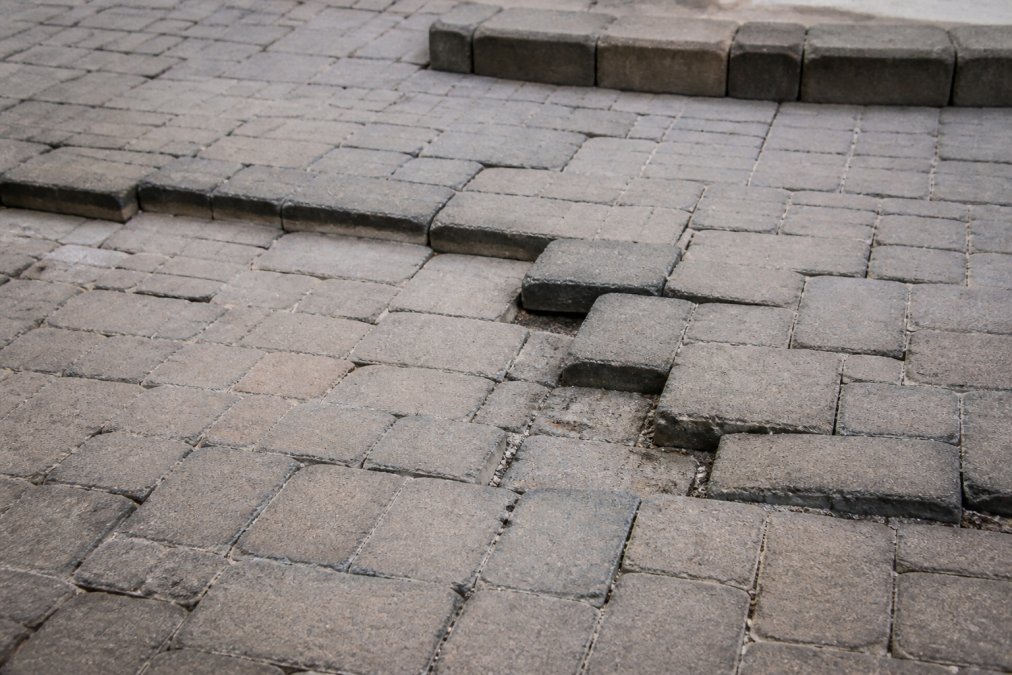
A paver surface is only as stable as the sub-base and bedding layer supporting it. When a contractor skips proper excavation depth, uses too little aggregate, or fails to compact in lifts, the pavers settle at different rates, a walkway or patio that looks level on day one and dips within a season.
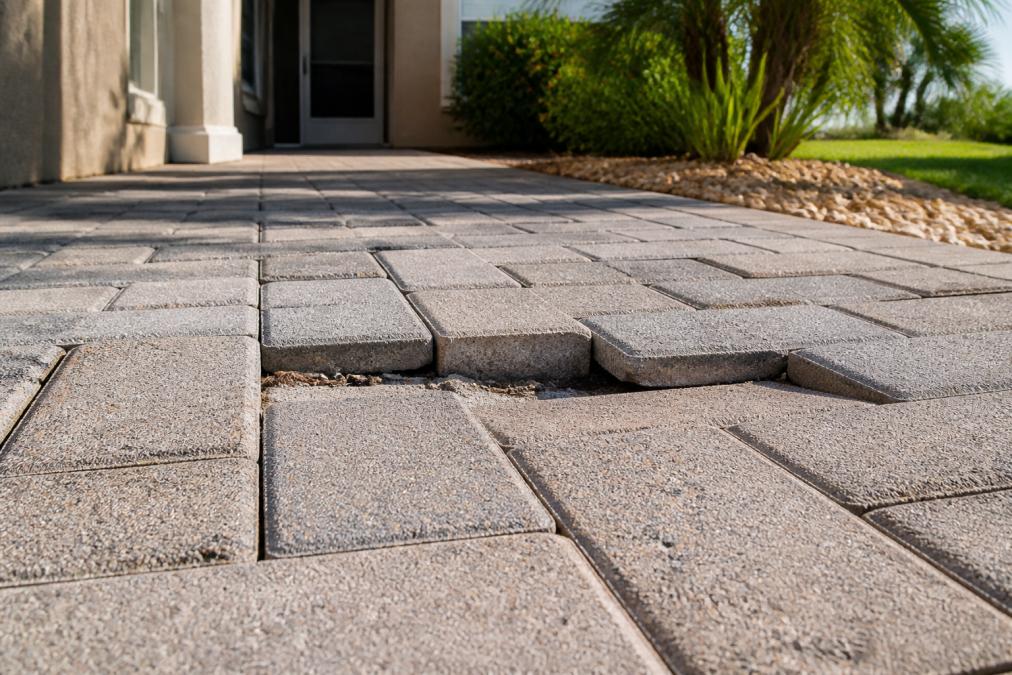
Poor paver installation rarely announces itself all at once. It shows up as a slight lip between two stones, then a hollow sound underfoot, then a visible dip where water collects. Catch these early and the repair is manageable; ignore them and you’re looking at full reconstruction.
2. Water Pooling and Drainage Problems on Your Patio
Water pooling on a paver patio means the drainage slope is wrong, the base has settled, or both. Pavers should shed water toward a designed low point, not hold it mid-patio.
Watch for these drainage red flags:
- Standing water that lingers more than a few hours after rain
- Puddling near the house foundation or along a walkway edge
- Water running toward the structure instead of away from it
- Soft, spongy spots where the bedding layer has washed out
A common mistake is assuming puddling is a surface issue you can fix by adding sand. In practice, water that can’t drain is a grading and base problem. The surface is just where the symptom appears.
If water pools against your foundation, that’s not a cosmetic problem. Poor drainage near a structure can lead to moisture intrusion and long-term damage. Have the grade evaluated before the next rainy season.
3. Cracks, Chips, and Joint Sand Loss
Cracked pavers and missing joint sand are two different problems that get blamed on each other. Separating them tells you whether you’re looking at surface wear or structural failure underneath.
Cracking: what it actually tells you. A paver is rigid, it doesn’t bend, so when it cracks, something beneath it moved and removed its support. A single cracked paver near a driveway apron or step is often impact damage (a dropped object, vehicle edge load, plow strike). Cracking that runs across a field, follows a line, or reappears after replacement is a base problem: the paver is spanning a void it was never designed to span, and it fails in tension.
Watch for these crack patterns:
- Hairline cracks radiating from a corner (point-load failure)
- Cracks that follow the same line across multiple pavers (sub-base settlement along a seam)
- Cracks near the edge restraint (the field is spreading and the pavers are being pulled apart)
- Cracks that reappear within a season of replacement (the support below was never fixed)
Chipping: usually a joint or edge issue, not a base issue. Chipped edges and corners typically come from pavers rubbing against each other because joints are too tight, joint sand has washed out, or the edge restraint is letting the field creep. Chipping alone rarely means the base failed; chipping plus widening joints plus border movement is a different story.
Joint sand loss: the interlock system breaking down. Joint sand isn’t decoration, it transfers load from one paver to the next and locks the field into a single, stiff surface. When it’s missing, each paver acts alone and moves under traffic, which opens joints further, chips edges, and lets weeds establish.
You’ll see joint sand loss as:
- Gaps widening between stones
- Sand tracking onto walkways, driveways, and into the house
- Edges chipping where pavers rub against each other
- Weeds taking root in open joints
- A hollow sound when you walk across the surface
Polymeric sand, installed correctly, resists washout far better than plain sand and is standard for most residential joints. But it cannot compensate for a failing base. If joints keep opening after a refill, the problem is below the surface, refilling joints on a moving base is a recurring cost, not a repair.
Free consultation & estimate →
Cracking that repeats, joints that reopen after refilling, and chipping along a spreading border all point to the same root cause: the base and edge restraint are not holding the field in compression. Surface fixes won’t change that.
4. Common Paver Installation Mistakes That Cause Early Failure
Most early paver failures come down to a short list of installation mistakes, and nearly all happen before the first stone is laid. What separates a job that lasts decades from one that fails in two seasons isn’t the paver, it’s the mechanics of what’s under it.
1. Insufficient excavation depth for the sub-base. The sub-base spreads the load of the pavers, bedding layer, and everything on top across the soil below. If excavation is too shallow, the base is too thin and the load concentrates on a smaller soil area than designed. The soil compresses, the base follows, and the pavers settle.
The quality of a paver installation is decided before a single stone is placed. If the base prep was rushed, no amount of surface work will fix it later, and the soil under the base determines how much margin for error the job had to begin with.
ICPI interlocking concrete pavement installation guidance
5. How to Prevent Sinking Pavers and Shifting Joints
Preventing sinking pavers starts with getting the base right the first time. There’s no reliable shortcut, and repairs that skip the base are temporary at best.
Here’s how proper installation prevents settling:
- Excavate deep enough to accommodate the full sub-base, bedding layer, and paver thickness
- Compact aggregate in shallow lifts, typically a few inches at a time
- Use geotextile fabric to stop soil from migrating into the base
- Set a drainage slope of roughly 1 to 2 percent away from structures
- Lock the perimeter with proper edge restraints
- Fill joints with polymeric sand and compact the surface
Ask your contractor how deep they excavate and how they compact the base. A confident, specific answer about lift thickness and equipment is a good sign. A vague one is not.
6. Paver Edge Restraint Failure: When the Border Gives Way
Paver edge restraint failure shows up as pavers spreading, tilting, or creeping outward at the border of a driveway or patio. The restraint is the hidden element holding the entire field in compression, when it fails, the whole surface loosens.
Signs to watch for:
- Border pavers leaning or separating from the field
- The outer row sinking or lifting
- Gaps opening along the perimeter
- Pavers migrating into lawn or garden beds
7. DIY vs. Professional Repair: What Homeowners Should Know
DIY paver repair works for small, cosmetic issues. It does not work for base failures, drainage problems, or edge restraint collapse, and attempting it usually makes those worse.
A simple decision framework helps:
- Single loose paver, intact base: A careful homeowner can reset it.
- Widespread settling or puddling: This is a base and drainage issue. Call a professional.
- Edge restraint failure: Requires excavation and re-pinning. Not a DIY job.
- Cracking across a driveway: Structural. Needs evaluation.
| Problem | DIY-Friendly? | Why |
|---|---|---|
| One loose paver, sound base | Yes | Reset and re-sand |
| Widespread sinking | No | Base failure underneath |
| Water pooling | No | Grading and drainage issue |
| Edge spreading | No | Restraint needs re-pinning |
| Joint sand loss only | Yes | Refill and compact |
Frequently Asked Questions
What are the most common paver installation mistakes?
The most common paver installation mistakes include insufficient base compaction, poor drainage slope, missing or inadequate edge restraints, and using the wrong joint sand. When the base layer is not compacted properly, pavers shift and sink within a year or two. Poor grading causes water to pool on the surface rather than drain away. Skipping edge restraints lets border pavers spread outward. Each of these mistakes shows up as visible signs of poor paver installation, including uneven surfaces, puddling, and loose stones.
Why are my pavers sinking or shifting after installation?
Pavers sink or shift when the base layer was not compacted to the correct density or when water is not draining away from the sub-base. In Southwest Florida, sandy soil and heavy summer rains make proper compaction and drainage slope critical. If the bedding layer is too thick or the sub-base lacks adequate aggregate, the pavers will settle unevenly. Hydrostatic pressure from trapped water can also push pavers upward, a process called heaving. A professional inspection can determine whether the issue is a base failure or a drainage problem.
How can you tell if a paver base was prepared incorrectly?
You can tell a paver base was prepared incorrectly if you see widespread sinking, uneven joints, or pavers that rock when you step on them. Another sign is water pooling in the middle of the patio rather than running off the edge. If the base was not compacted in lifts or if the aggregate was too fine, the pavers will not stay level. A visual checklist for home inspections includes checking for puddling after rain, tapping pavers to listen for hollow spots, and looking for joint sand washing out repeatedly.
Is it normal for pavers to have gaps between them?
Small, uniform gaps between pavers are normal and necessary. They allow joint sand to lock the pavers together and accommodate slight movement from temperature changes. However, wide or uneven gaps are a sign of poor installation. If gaps exceed a quarter inch or vary significantly across the surface, the pavers may have been laid too far apart or the edge restraints are failing. Polymeric sand can fill normal gaps, but it will not fix structural movement. Persistent gaps often indicate a base or edge restraint problem that needs professional repair.