
Table of Contents
- Signs Your Patio Has a Drainage Problem
- Patio Slope Requirements: Getting the Grade Right
- How to Prevent Sinking Pavers With Proper Base Preparation
- Installing French Drains for Patios: Step-by-Step
- Channel Drains and Surface Water Management
- Retrofitting Drainage Under an Existing Patio
- Permits, DIY Limits, and When to Call a Professional
- Conclusion
- Frequently Asked Questions
Last Updated: September 28, 2026
Signs Your Patio Has a Drainage Problem
Fixing drainage issues under patios starts with spotting the warning signs early. Water that sits on your pavers after a storm is telling you something, and ignoring it costs money. At Venice Pavers, we’ve seen how quickly a small pooling problem turns into a sunken, unstable patio.
The two biggest red flags are standing water and uneven pavers.
Standing Water and Pooling After Rain
Standing water is the clearest sign of a drainage problem. If puddles linger for more than a few hours after rain, your patio isn’t shedding water the way it should.
Watch for these signs:
- Water pooling in the same low spots every time
- Damp patches that stay wet for days
- Water creeping toward your home’s foundation
- Mosquitoes breeding in shallow puddles
Pooling happens when the surface has lost its slope, when the base layer has settled, or when there’s no outlet for surface runoff.
Sinking, Shifting, and Uneven Pavers
Uneven pavers usually mean the base underneath has failed. When soil compacts or washes away, the pavers above it drop and shift.
Here’s what to look for:
- Pavers that rock when you step on them
- Visible dips or trip hazards
- Widening gaps between pavers
- Sand washing out of the joints
These problems rarely fix themselves. Catching it early saves you from a full rebuild later.
Patio Slope Requirements: Getting the Grade Right
Patio slope requirements call for a drop of about 1 inch for every 4 feet of patio, moving away from your home. This gentle grade lets gravity move water off the surface instead of letting it pool.
That 2% slope is the industry standard for a reason. Too flat, and water sits. Too steep, and the patio feels awkward to walk on and pavers can slide.
A few things to know about getting the grade right:
- Slope should always run away from the foundation
- A minimum 2% grade works for most paver patios
- Water should flow toward a drain, lawn, or swale
- Check the slope after heavy rain to confirm it’s working
The tricky part is that slope can disappear over time. Soil settles, the base shifts, and what was once a proper grade turns flat. That’s when pooling starts.
How to Prevent Sinking Pavers With Proper Base Preparation
How to prevent sinking pavers comes down to one thing: a base that won’t move.
The base is the foundation.
Soil Compaction and Base Layer Depth
Soil compaction is the step most DIY installs skip.
For a paver patio, the base layer typically runs 4 to 6 inches deep for pedestrian use, compacted in lifts. Each lift should be compacted before the next goes down.
Key steps for a solid base:
- Excavate deep enough for base plus bedding sand
- Compact the subsoil before adding aggregate
- Add base material in 2-inch lifts
- Compact each lift with a plate compactor
- Check slope as you build
Permeable Paver Maintenance and Joint Sand
Permeable paver maintenance keeps water moving through the surface instead of running off it.
The catch is that joints clog over time. Dirt, leaves, and debris fill the gaps.
Keep permeable pavers working with this routine:
- Sweep or vacuum the surface a few times a year
- Replenish joint sand or gravel as it settles
- Keep fallen leaves off the surface in autumn
- Avoid washing dirt into the joints
Installing French Drains for Patios: Step-by-Step
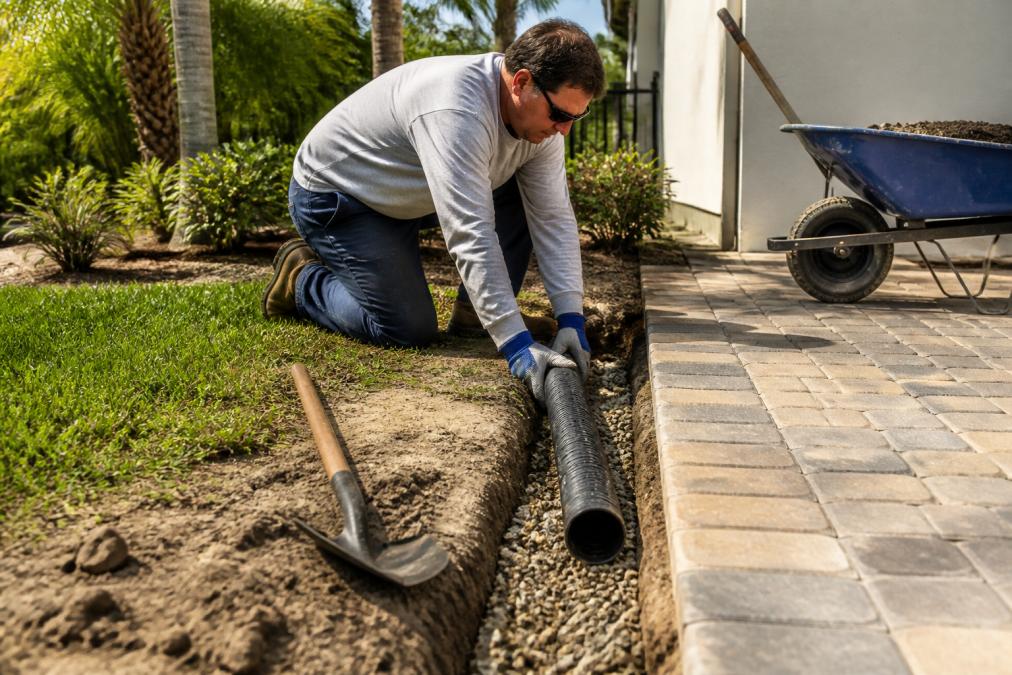
Installing French Drains Venice for patios captures water underground and carries it away before it reaches the surface.
Trenching, Perforated Pipe, and Aggregate Backfill
The trench is where the work happens.
Here’s the process:
Free consultation & estimate →
- Mark the trench line along the low edge of the patio
- Dig a trench about 12 to 18 inches deep and 6 to 12 inches wide
- Line the trench with filter fabric to keep soil out
- Add a 2 to 3 inch layer of washed aggregate
- Lay the perforated pipe with holes facing down
- Cover the pipe with more aggregate
- Fold the fabric over the top and backfill with soil
The pipe needs a steady slope, about 1 inch per 8 feet. Perforated pipe collects water along its length. A solid pipe at the outlet carries it away.
Connecting to a Catch Basin or Drainage Basin
A catch basin or drainage basin gives the water a place to go.
Options for the outlet:
- Tie into an existing storm drain if allowed
- Run the pipe to a dry well or drainage basin
- Discharge to a lower area of the yard
- Connect to a pop-up emitter at the curb
Check local rules before tying into any municipal system. Some areas restrict what can connect to storm drains.
Channel Drains and Surface Water Management
Channel drains handle surface water that sheeting and grading can’t move fast enough.
They work best in spots where water collects against a wall, at a doorway, or along the edge of a hardscape.
Where channel drains make sense:
- Along the base of a retaining wall
- At the threshold of a patio door
- Where a patio meets a driveway
- At the low edge of a sloped patio
Pair a channel drain with a French drain for a full system.
Retrofitting Drainage Under an Existing Patio
Retrofitting drainage under an existing patio is possible without tearing out the whole surface, but it takes planning.
The approach depends on the problem. If surface water is the issue, re-grading or adding a channel drain at the edge often helps. If the base is waterlogged, you may need to lift a strip of pavers along the edge and install a French drain.
A common retrofit method:
- Cut a narrow trench along the patio edge
- Remove the pavers and base in that strip
- Install the perforated pipe and aggregate
- Rebuild the base and reset the pavers
- Restore the slope toward the new drain
What most guides miss is that retrofitting works best when the pavers can be lifted and reset without damage.
Permits, DIY Limits, and When to Call a Professional
Permits and professional help come into play more often than homeowners expect. Local building codes vary, and some drainage work needs a permit, especially when it ties into storm systems or changes how water leaves your property.
Know your DIY limits. These jobs are reasonable for a handy homeowner:
- Re-sanding joints
- Re-grading a small area
- Clearing a clogged drain line
- Adding a downspout extension
These jobs are better left to a pro:
- Installing a full French drain system
- Cutting into an existing patio
- Tying into storm drains or municipal systems
- Fixing a failed base layer
The threshold is simple. If the fix touches your foundation, the base layer, or a municipal system, call a professional. Water diverted the wrong way can damage your home or your neighbor’s property.
For homeowners in Southwest Florida, our team at Venice Pavers handles drainage planning as part of every patio and hardscape install. We plan the base and the drainage together, so you don’t end up fixing a problem we could have prevented. Our certified Tremron installer status and lifetime workmanship guarantee back that up.
Conclusion
Drainage problems under a patio rarely fix themselves. Whether you’re re-grading a slope, installing a French drain, or retrofitting under an existing surface, the goal is the same: move water away from your home and off your pavers.
At Venice Pavers, we’ve spent over 30 years getting base preparation and drainage planning right the first time. Our team handles the full job, from re-grading and French drain installation to channel drains and paver resetting.
Get started with Venice Pavers and a free consultation and estimate.
Frequently Asked Questions
Can you add drainage to an existing patio without removing it?
Yes, in many cases. Retrofitting options include cutting a narrow channel deco drain along the low edge, installing a French drain just outside the patio perimeter, or lifting only the affected pavers to correct the base and slope. A contractor can often remove a single row of pavers, excavate a trench, lay perforated pipe in aggregate, and reinstall the same pavers. Full removal is only necessary when the entire base layer has failed or the patio slope is wrong across the whole surface.
What are the signs of poor drainage under a patio?
Watch for standing water or pooling that lingers more than a day after rain, water staining on the house foundation, sinking or rocking pavers, sand washing out of the joints, and moss or algae growth in shaded corners. Any of these signs means surface runoff is not moving away from the patio and the subsurface drainage needs attention.
How do you determine the proper patio slope?
A patio should slope away from the house at roughly 1/8 to 1/4 inch per foot. That works out to about 1 to 2 percent. The slope must direct water toward a lawn, swale, channel drain, or catch basin, never toward the foundation. Check the grade with a string level or a long straightedge and a level. If the patio is flat or slopes toward the house, regrading the base layer or adding a surface drain is the fix.
When should you hire a professional for patio drainage repairs?
Call a professional when water pools against the foundation, when more than a few pavers have sunk or heaved, when the patio has no existing slope, or when you need a French drain or channel drain tied into a municipal storm system. Permits and utility locates may also be required. A licensed hardscape contractor can assess soil compaction, water table depth, and hydrostatic pressure, then design a drainage system.