Table of Contents
- Why Sandy Soil Requires a Different French Drain Approach
- Step 1: Assess Your Drainage Problem and Plan the Route
- Step 2: Determine French Drain Depth and Slope for Sandy Conditions
- Step 3: Excavate the Trench and Prepare the Base
- Step 4: Select the Right French Drain Gravel Size
- Step 5: Install Perforated Pipe and Prevent Sand Infiltration
- Step 6: Choose Your French Drain Outlet Options
- French Drain Alternatives When Conditions Don’t Fit
- Frequently Asked Questions
Last Updated: October 19, 2026
Why Sandy Soil Requires a Different French Drain Approach
Sandy soil drains fast, which sounds good until sand particles clog your gravel and filter fabric instead of letting water reach the pipe.
A French drain in sandy soil needs tighter filtration to keep sediment out of the perforated pipe, and slope and outlet location matter more. Get these three wrong, and your drain clogs within a season or two.
Step 1: Assess Your Drainage Problem and Plan the Route
Before you dig, walk your yard after heavy rain and find puddles or soggy patches that sit for hours. That’s your problem zone.
Next, trace the path your French drain should follow:
- Start at the wettest spot (your catch basin location)
- Follow the natural slope downhill
- End at a safe outlet at least 10 feet from your foundation
Mark this route with chalk or spray paint; the straighter your line, the easier installation becomes. Check local regulations first, some areas require permits or restrict discharge locations.
The EPA’s guidance on residential drainage systems covers best practices for outlet placement and runoff management.
Step 2: Determine French Drain Depth and Slope for Sandy Conditions
Most guides say “keep a steady slope” and move on. That fails in sandy soil, where the trench bottom shifts, walls slump, and water carries fines straight into your pipe.
Depth: what you are actually trying to intercept
Depth is not a single number, it is set by what water you are trying to capture.
- Surface pooling and sheet flow: 12 to 18 inches below grade is usually enough to intercept water before it stands. The trench bottom sits below the low spot you are draining.
- Shallow subsurface water and foundation protection: 18 to 24 inches is the common working range. The pipe should sit below the level where water accumulates against the foundation or patio edge.
- High water table: if you hit standing water in the hole within a foot or two of your planned depth, stop. A French drain cannot lower a water table; it will just sit submerged. That is a pump or professional-assessment situation, not a digging situation.
In sand, dig to the deeper end of your target range when you can, a deeper trench intercepts more subsurface flow, at the cost of wall stability.
Slope: pick a number and hold it
A workable target for a sandy-soil French drain is 1 inch of fall per 10 feet of trench, with a minimum of about 1 inch per 20 feet and a practical maximum around 1 inch per 8 feet. Here is why the range matters in sand specifically:
- Too flat (under ~1 inch per 20 feet): water moves slowly, sand settles out of suspension inside the gravel and pipe, and you get clogging at the low end.
- Too steep (over ~1 inch per 8 feet): water velocity scours the trench, erodes the sand bed under the gravel, and washes fines into the perforations. In clay this is less of an issue; in sand it is the leading cause of early failure.
- Consistent beats steep: a uniform 1 inch per 10 feet outperforms a trench that is flat for 20 feet and then drops 6 inches. Low spots are where sediment collects.
How to calculate total fall
Multiply your trench length by your chosen fall rate, then convert to inches.
- 40-foot run at 1 inch per 10 feet = 4 inches of total drop from start to outlet.
- 60-foot run at 1 inch per 10 feet = 6 inches of total drop.
- 40-foot run at the minimum 1 inch per 20 feet = 2 inches of total drop.
Write the start and end elevations on a stake before you dig. If your yard’s natural grade gives you more drop than the target, hold the pipe at your planned slope and let the outlet sit higher than the trench bottom, as long as water still exits by gravity.
Verifying grade without guessing
String and a line level is the reliable DIY method, more accurate than eyeballing a bubble level on a shovel handle.
- Drive a stake at the start and a stake at the outlet.
- Tie a string between them and set it to your planned total fall using a line level and a tape measure.
- Check the trench bottom against the string every 4 to 5 feet as you dig. Any point where the bottom rises above the string is a high spot to remove; any point where it drops below is a low spot to fill and re-compact.
- Re-check after you add the gravel bed. Gravel placement moves the bottom more than people expect, especially in sand.
A note on sand and slope interaction
Sand’s high permeability means water reaches the pipe fast, so slope’s job is to keep velocity low enough that fines stay in the gravel rather than the pipe, the opposite of the instinct most people bring from clay soils. Treat slope as a sediment-control decision, not just a flow decision.
Step 3: Excavate the Trench and Prepare the Base
Dig your trench to the planned depth and slope. Use a trenching shovel or rent a walk-behind trencher for large yards.
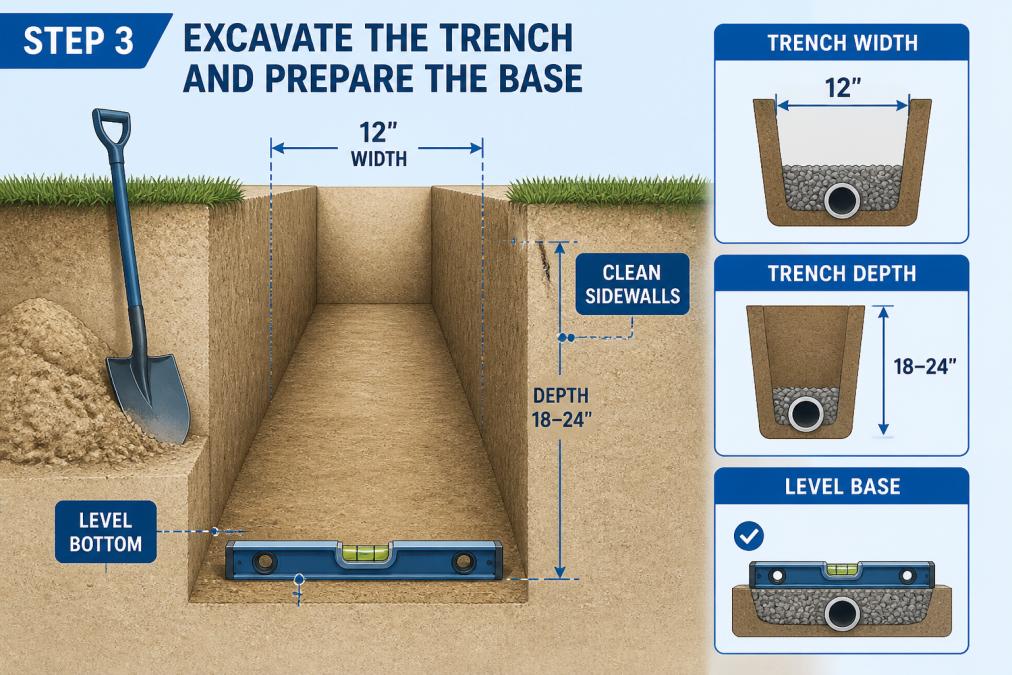
Trench width: 9 to 12 inches wide gives you room to work and fits standard perforated pipe with gravel on both sides.
Level the bottom: Critical in sandy soil, where an uneven bottom creates low spots that pool water and settle sediment.
Step 4: Select the Right French Drain Gravel Size
Gravel size matters more in sandy soil than anywhere else. Fine gravel or pea gravel clogs quickly because sand particles slip through and pack around the stones.
Use 3/4-inch to 1-inch drain rock or crushed stone. This size lets water pass while creating a natural barrier that stops sand from reaching your perforated pipe.
Depth of gravel: Place 2 to 3 inches of drain rock under the pipe and another 3 to 4 inches on top.
Step 5: Install Perforated Pipe and Prevent Sand Infiltration
This is where sandy-soil drains succeed or fail. In clay or loam, a perforated pipe in gravel works for years with minimal filtration. In sand, fines migrate through gravel and perforations into the pipe, and once they settle, the drain is dead. The fix is a layered system.
Free consultation & estimate →
Pipe selection and hole orientation
Use 4-inch perforated PVC (or the corrugated HDPE equivalent) for typical residential yard drainage. The perforations are roughly 1/8 inch, far larger than most sand particles, which is exactly why you cannot rely on the holes alone to keep sand out.
Lay the pipe with holes facing down. Water enters from below, where the gravel bed has already filtered it, and the top of the pipe stays shielded from the sand-laden flow coming down through the trench.
The filtration stack: gravel gradation, fabric, and overlap
Think of the trench as a filter with three layers, each blocking progressively finer material:
- Washed drain rock (3/4-inch to 1-inch) around the pipe. Angular crushed stone is preferred over smooth river rock because the angular faces interlock and create a more stable matrix that resists sand migration. Place 2 to 3 inches under the pipe and 3 to 4 inches over it.
- Geotextile fabric as the separation layer. A non-woven geotextile is the standard choice for sandy soil because it passes water while blocking fines. The fabric goes between the native sand and the gravel, not wrapped tightly around the pipe like a sausage, which is a common but counterproductive shortcut. Wrapping the pipe tightly creates a fabric surface that blinds off with fines and starves the perforations.
- Overlap and orientation. Overlap fabric sections by at least 12 inches and orient the overlap so water flows from the upper layer over the lower layer, not into the seam. Secure with landscape staples so the fabric does not shift during backfill.
Why aggregate gradation matters more in sand
The gravel is the first stage of the filter. Graded, angular stone creates enough void space for water to pass freely while larger sand grains are held back at the fabric interface; uniform, rounded stone packs tighter and accelerates clogging.
Connecting sections and protecting the joints
- Use the manufacturer’s couplers or slip fittings rather than butting pipe ends together; in sand, backfill pressure shifts sections and an open joint becomes a sand intake.
- Keep the pipe clean during installation, a shop vac or quick flush before backfill removes grit that would otherwise settle at the low end.
- Leave a cleanout or inspection access at the upstream end if the run is long; in sandy soil, the ability to flush the line separates a maintainable drain from a disposable one.
The takeaway for sandy sites
The pipe is the least important part of the filtration system. Gravel gradation, fabric placement, and hole orientation do the work. Get those three right and a standard 4-inch perforated pipe will last; get them wrong and no pipe on the market will save the drain.
Step 6: Choose Your French Drain Outlet Options
Water has to go somewhere. Your outlet choice determines whether your drain works or becomes a liability.
Option 2: Catch basin with discharge line. If you can’t reach daylight, install a catch basin (a plastic or concrete box) at the low point.
Option 3: Dry well. Some properties have nowhere to discharge water safely.
In Southwest Florida, daylight outlet is usually best.
Local stormwater management guidelines specify rules for discharge locations in your area.
French Drain Alternatives When Conditions Don’t Fit
French drains work for most yard drainage problems, but not all. Before you commit to excavation, consider whether your situation fits.
When a French drain is the right choice:
- Standing water appears after rain or irrigation
- Water pools near a foundation or patio
- Soil is sandy or loamy (drains reasonably well)
When alternatives make more sense:
- Your yard is very flat with no outlet (consider a sump pump system instead)
- Water comes from a spring or high water table (a drain won’t solve it, you need a pump)
- The problem is surface runoff from a roof or driveway (gutters and grading work better)
For complex drainage problems, professional yard flooding drainage assessment saves time and money. Venice Pavers offers free consultations to evaluate your yard and recommend the right solution.
The National Association of Landscape Professionals’ drainage design standards outlines when French drains are appropriate and when alternatives work better.
Standing water ruins yards and damages foundations.
If your yard has persistent drainage issues or you’re not confident tackling excavation, Venice Pavers can help. We assess your situation, design a system that fits your soil and slope, and install it with the meticulous base preparation that prevents future problems. Get a free consultation and let us evaluate whether a French drain is right for your property.
Frequently Asked Questions
Does a French drain work in sandy soil?
Yes, French drains work effectively in sandy soil, but they require different design than clay-heavy yards. Sandy soil drains quickly, which is an advantage, but it also means fine sand particles can clog the perforated pipe if not properly filtered. The key is using a landscape fabric barrier and appropriately sized gravel to prevent sand infiltration while allowing water to flow freely into the drain.
How deep should a French drain be in sandy soil?
In sandy soil, dig your French drain 18 to 24 inches deep. Sandy soil’s rapid drainage means you don’t need extreme depth, but this range allows the drain to capture water from the root zone and foundation level. Shallower drains may miss subsurface water flow; deeper drains add unnecessary cost without additional benefit in sandy conditions.
What size gravel should I use for a French drain?
Use 3/4-inch to 1-inch clean drain rock or crushed stone for French drains in sandy soil. This size allows water to flow freely while being large enough that fine sand cannot pass through into the perforated pipe.
What are the alternatives to a French drain?
If a French drain isn’t suitable, consider a surface swale (a shallow, vegetated channel directing water away), a dry well (a gravel-filled pit for water absorption), a sump pump system for persistent standing water, or regrading your yard to improve natural slope. Each option works best for different water volumes and soil conditions. A drainage professional can assess your specific situation and recommend the most cost-effective solution.