Table of Contents
- Why Florida Pavers Sink: Sandy Soil, Water, and Base Failure
- Diagnostic Checklist: Inspect Your Paver Base Before You Lift Anything
- How to Raise a Sunken Paver: Step-by-Step Repair Process
- Paver Base Repair: Rebuilding a Compacted Base That Lasts
- Fixing Paver Drainage Problems: Grading, Runoff, and Irrigation
- How to Reset Pavers and Reinstall Them Correctly
- When to DIY vs. Call a Professional for Sinking Pavers
- Preventing Sinking Pavers: Long-Term Maintenance and Repair Decisions
- Frequently Asked Questions
Last Updated: October 5, 2026
Why Florida Pavers Sink: Sandy Soil, Water, and Base Failure
Sinking pavers in Florida almost always come down to water moving through sandy soil under a base that was never built to handle it. This guide from Venice Pavers breaks down why it happens and how to fix it.
Sinking pavers have dropped below the surrounding surface, creating dips, trip edges, and standing water. In Florida, the cause is rarely the paver itself, it is the ground beneath it especially for sinking paver pool decks.
How Florida Sandy Soil and Heavy Rain Cause Soil Settling
Florida’s sandy soil drains fast but shifts easily. When heavy summer rain soaks the ground, fine sand washes out from under the base, the soil settles, and the pavers above it drop. This soil settling from poor base preparation and this the number one reason pavers sink here.
Drainage Issues, Irrigation Leaks, and Water Runoff
Water is the enemy of every paver base. Poor drainage pools water under the surface, irrigation leaks soak the same spot for months, and runoff from a roof or slope erodes the soil. Over time, all three cause base failure, the real problem is almost always underneath the pavers, not the pavers themselves.
Diagnostic Checklist: Inspect Your Paver Base Before You Lift Anything
Before you lift a single paver, diagnose the cause. Lifting pavers without finding the water source means the problem returns in a season. The checklist below pairs each symptom with its likely cause so you can decide between a spot repair and a base rebuild.
Symptom-to-Cause Diagnostic Table
|
What You See |
Most Likely Cause |
How to Confirm |
|---|---|---|
|
One or two low pavers, rest level |
Localized soil settling or bedding-sand loss |
Tap the pavers, a hollow sound means the bedding layer is gone |
|
Wavy surface across a large area |
Base failure from repeated saturation |
Walk the area after rain; soft, spongy spots confirm it |
|
Water pools in the same spot every storm |
Grading or drainage failure |
Watch the surface during a hard rain and trace where water enters |
|
Ground stays wet days after rain |
Irrigation leak feeding the soil |
Shut off the zone for 48 hours and recheck |
|
Pavers spreading at the edge |
Edge restraint failure |
Inspect the border for missing or loose restraint |
|
Trip hazard at a pool edge |
Coping or base movement |
Check for cracks in the coping and gaps at the bond beam |
|
Joint sand washing out repeatedly |
Runoff or poor joint sand |
Look for sand trails after storms |
Regional Diagnosis: Sandy Soil, Heavy Rain, and Seasonal Storms
Not all sinking is the same problem. Diagnosis depends on where the pavers sit and what the ground does under them.
- Inland sandy lots: Fast-draining sand shifts when saturated, so fine particles wash out during summer downpours and settling is localized and sudden.
- Coastal and low-lying lots: A high water table keeps the subgrade damp year-round, so base material stays saturated and settles slowly and evenly, the whole surface goes wavy instead of one paver dropping.
- Lots with mature landscaping: Irrigation zones run for years in the same spots, and a slow leak sinks one area while the rest stays level.
Distinguishing Base Failure from Irrigation and Drainage Problems
These three causes look similar but require different fixes.
- Base failure: Pavers move as a group, the surface is wavy, and low spots follow the shape of the base, not a water path.
- Irrigation leak: One wet spot that never dries, often near a head or line. Shut off the zone and watch for 48 hours.
- Drainage problem: Water pools in the same place after every storm and drains slowly, though the pavers may still be level.
- Look for standing water after rain
- Check for low spots and trip hazards
- Inspect irrigation heads and lines nearby
How to Tell Whether Drainage Is Causing Pavers to Sink
Watch the surface during a hard rain. Water pooling in the same spot every time points to drainage. Ground that stays wet long after the rain stops suggests an irrigation leak. A whole surface that is wavy and soft underfoot means the base has failed, and no surface-level patching will hold.
How to Raise a Sunken Paver: Step-by-Step Repair Process
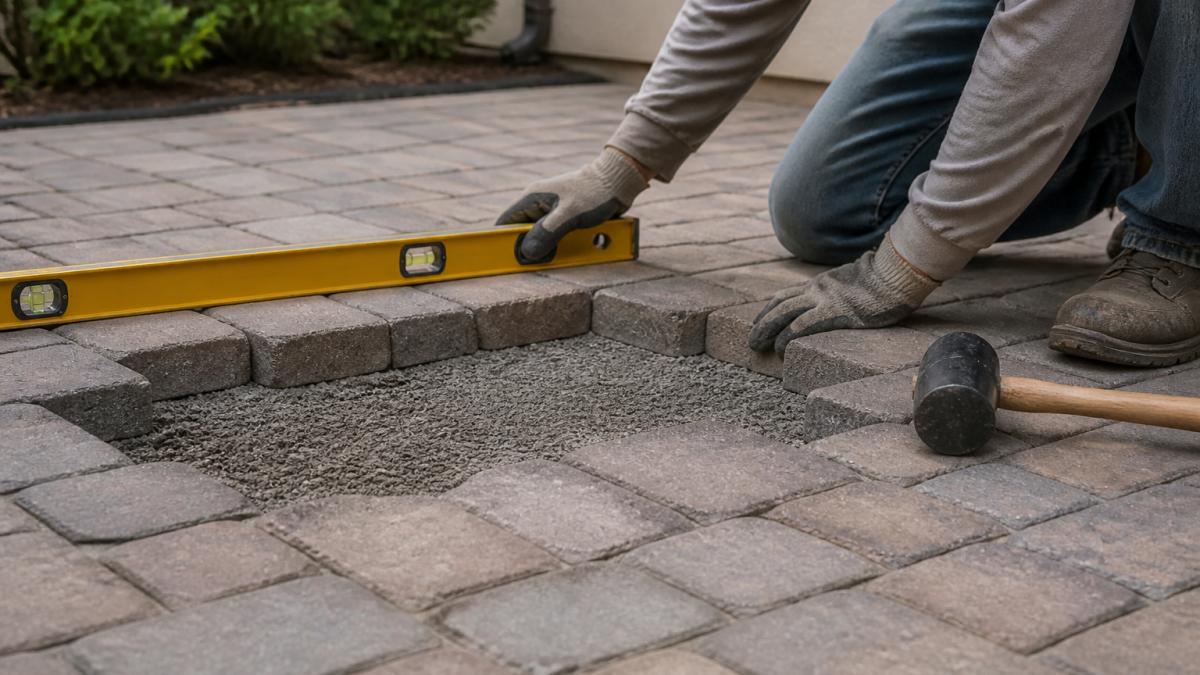
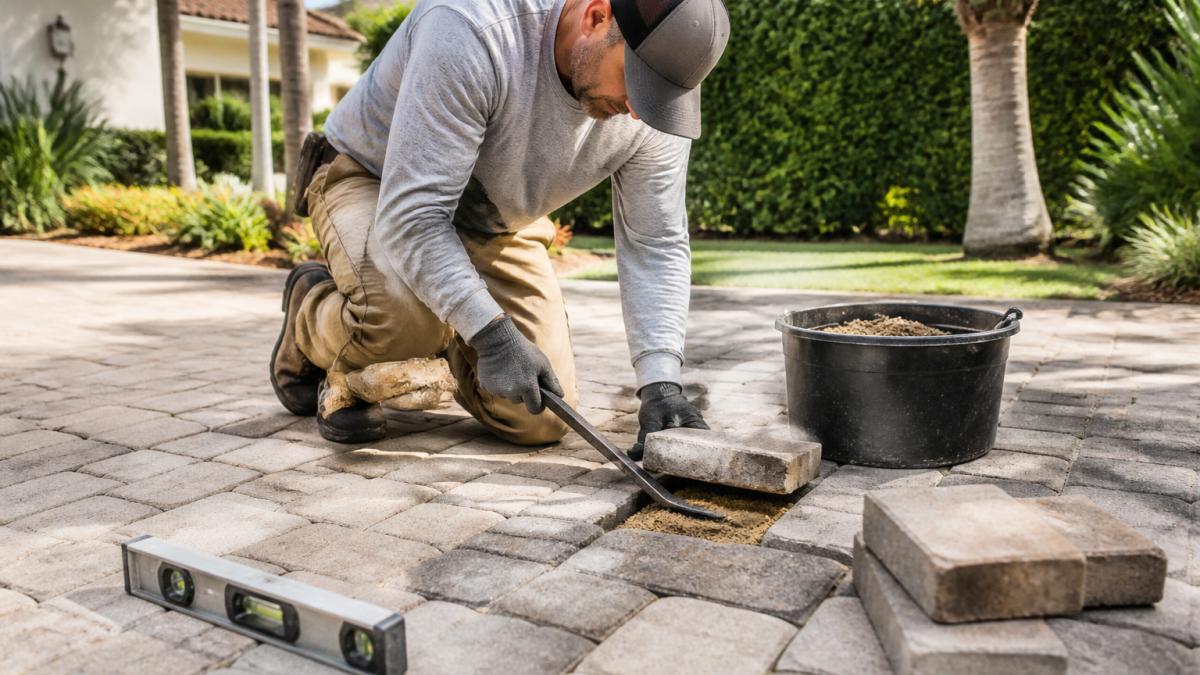
Raising a sunken paver means lifting it, fixing the base underneath, and resetting it level. Skip the base fix and it sinks again.
Tools and Materials You Will Need
- Flat pry bar or paver extractor
- Rubber mallet
- Level and string line
Lifting, Removing, and Regrading the Affected Area
Work from the edge of the repair area inward. Lift each paver and set it aside in order so you can reinstall them the same way. Remove the old bedding sand, then regrade the exposed base so water flows away from the house.
Paver Base Repair: Rebuilding a Compacted Base That Lasts
Paver base repair means removing the failed material and rebuilding a compacted base from the ground up. An uncompacted base will settle again, no matter how good the pavers are.
Base Material, Compaction, and Bedding Sand Depth
For most patios and walkways, base material runs about 4 to 6 inches deep; for driveways, 8 to 12 inches. Compact in 2-inch lifts, add bedding sand at about 1 inch deep, and screed it flat before resetting the pavers.
Fixing Paver Drainage Problems: Grading, Runoff, and Irrigation
Paver drainage problems start with grading. The surface should slope away from your home at roughly a 1 to 2 percent grade, about 1 to 2 inches of drop for every 8 feet. Redirect downspouts and runoff away from the paver area, fix irrigation leaks before rebuilding anything, and if water still pools, a channel drain or French drain may be the answer.
Free consultation & estimate →
How to Reset Pavers and Reinstall Them Correctly
Resetting pavers means placing each one back on a level, compacted base and locking it in with joint sand. Get the base right first, then the surface takes care of itself.
Set each paver with a rubber mallet. Check the level as you go. Sweep dry sand or polymeric sand into the joints once everything is set. Polymeric sand hardens and resists washout, which helps on patios and driveways.
When to DIY vs. Call a Professional for Sinking Pavers
Small fixes are fine to DIY. A single sunken paver or a short walkway section is a weekend job. Call a professional when the problem is bigger. The decision comes down to three things: how much of the surface is affected, what is underneath it, and whether the repair touches anything structural.
Repair Scope: Spot Repair vs. Base Reconstruction
Use the size and pattern of the failure to decide.
- Spot repair (DIY-friendly): One to a few pavers, a single low spot, or a short walkway section, with the surrounding surface level and stable. You can lift, regrade, and reset in a day.
- Section repair (DIY possible with care): A defined area, say, a 4-by-8-foot section of patio, where the base has failed but the rest of the surface is sound. You will need to cut a clean edge, rebuild the base in lifts, and blend the repair into the surrounding pavers.
- Full base reconstruction (pro territory): The whole patio or driveway is wavy, water pools across a large area, or the base has failed over a wide span. This scale requires a plate compactor, proper base depth, and grading that ties into the rest of the yard.
Safety Thresholds: When DIY Is Unsafe or Impractical
Some repairs should not be a DIY project regardless of size.
- Around pools: Paver coping sits on a bond beam with the pool shell and plumbing underneath. Lifting coping without knowing what is below can damage the shell or a line, so pool-edge repairs are a pro job.
- Over utilities: Irrigation mains, gas lines, electrical conduit, and sewer laterals run under many patios and driveways. If you do not know what is buried, call 811 before you dig, and if the repair overlaps a utility, bring in a pro.
- At structural edges: Pavers against a foundation, retaining wall, or step are tied into the structure, so movement there can mean a foundation or wall issue, not just a paver issue.
Repair vs. Replacement: How to Decide
When repair costs climb toward replacement, replacement often wins. A single lifted paver is a repair; a base that has failed across the whole surface is usually a rebuild. Rules of thumb:
- If the failure is isolated and the surrounding base is sound, repair.
- If the failure is widespread and the base is compromised, rebuild the base, replacing pavers without fixing the base just moves the problem.
- If the pavers are cracked, spalling, or faded, replacement may make more sense than resetting worn pavers on a new base.
What a Professional Inspection Should Cover
If you are unsure, a professional inspection saves money in the long run. It should include a moisture check to find the water source, a base depth and compaction assessment, a grading and drainage review, a check of edge restraint and joint sand, and a written scope separating spot repair from base reconstruction. Ask for the scope in writing so you can compare it against what you would do yourself.
Preventing Sinking Pavers: Long-Term Maintenance and Repair Decisions
Prevention comes down to water control and base integrity. Keep water moving away from your pavers and the base stays solid.
- Re-sand joints every few years
- Fix irrigation leaks right away
- Clear drains before rainy season
|
Problem |
Likely Cause |
Fix |
DIY or Pro |
|---|---|---|---|
|
One low paver |
Local soil settling |
Lift, regrade, reset |
DIY |
|
Wavy surface |
Base failure |
Rebuild compacted base |
Pro |
|
Pooling water |
Poor drainage |
Regrade, add drain |
Pro |
|
Wet spot that never dries |
Irrigation leak |
Repair line, recompact |
Pro |
|
Trip hazard at edge |
Shifting pavers |
Reset and re-sand joints |
DIY or Pro |
Sinking pavers are a drainage and base problem, not a paver problem. If your patio, walkway, or driveway has wavy spots, standing water, or trip hazards, it is worth fixing before it gets worse. Venice Pavers has spent over 30 years building hardscape that holds up, with meticulous base preparation, drainage planning, and a lifetime workmanship guarantee.
Frequently Asked Questions
How do you fix sunken pavers?
Lift the affected pavers, inspect the base for soft or eroded spots, and rebuild the base with compacted material. Add a thin layer of bedding sand, then reset and level the pavers. Fill joints with polymeric sand and compact the surface. In Florida, correcting drainage and irrigation leaks at the same time prevents the problem from returning within a season.
Why do pavers sink in Florida sandy soil?
Florida’s sandy soil drains quickly but shifts easily when saturated. Heavy summer rain, poor grading, or an irrigation leak can wash fine particles out of the base, leaving voids under the pavers. Without a properly compacted base 4 to 6 inches deep, the surface settles unevenly. Correcting the soil and base before resetting pavers is the only permanent fix.
Can you fix sunken pavers without replacing them?
Yes, in most cases. If the pavers themselves are intact, you can lift them, repair the base, and reset the same pavers. Replacing pavers is only necessary when they are cracked, chipped, or stained beyond cleaning. Reusing existing pavers also helps you match the original color and pattern, which is difficult with aged or discontinued styles.
How much does it cost to fix sunken pavers?
Costs vary widely based on the size of the repair area, the condition of the base, drainage corrections needed, and whether you DIY or hire a contractor. For an accurate estimate, request a free consultation and on-site evaluation from a licensed paver contractor who can assess the base and drainage.