Table of Contents
- What Residential Paver Patio Installation Services Include
- Paver Patio Design Ideas That Fit Your Home’s Architecture
- Base Preparation and Hardscape Drainage Solutions
- Paver Patio Installation Timeline: What Each Phase Looks Like
- How to Add Lighting to Paver Driveways and Patios
- Choosing a Licensed Contractor and Understanding the Warranty
- Frequently Asked Questions
Last Updated: September 25, 2026
What Residential Paver Patio Installation Services Include
Residential paver patio installation services cover the full scope of turning a bare yard into a finished outdoor room: consultation, design, excavation, base preparation, drainage planning, paver setting, cutting, edge restraint, joint sand, and cleanup. At Venice Pavers, our crews have handled this work across Southwest Florida for more than 30 years, and the projects that hold up are the ones where the invisible work gets the most attention.
Here’s the short version of what you’re actually buying:
|
Phase |
What Happens |
Why It Matters |
|---|---|---|
|
On-site consultation |
Measure, grade check, material review |
Prevents design that fights your yard |
|
Excavation |
Remove sod and soil to depth |
Sets the foundation depth |
|
Base preparation |
Crushed stone, compaction in lifts |
Stops sinking and shifting |
|
Drainage planning |
Slope, channel, and flow direction |
Prevents standing water |
|
Paver setting |
Pattern, cuts, edge restraint |
Delivers the finished look |
|
Joint sand and cleanup |
Fill, compact, seal guidance |
Locks pavers and finishes the job |
From On-Site Consultation to Final Joint Sand
Expect the consultation to cover:
- Measurements and existing slope
- Where water currently pools or flows
- Utility locations and access for equipment
- Material options, paver patterns, and layout
- A written project scope and free estimate
The final step, joint sand, is what homeowners remember least and benefit from most. Sand fills the gaps, locks pavers against lateral movement, and discourages weeds. Skipping or rushing it shortens the life of an otherwise solid install.
Paver Patio Design Ideas That Fit Your Home’s Architecture
Design should start with the house, not a catalog. A patio that ignores your home’s lines, colors, and roofline looks added-on rather than built-in. Durable designs also start with how you’ll use the space and how water and heat behave on it.
Matching Paver Material to Your Home and Your Climate
The material you choose drives cost, maintenance, and how the patio feels underfoot. Here’s how the common options compare in a hot, humid, salt-air climate:
|
Material |
Best For |
Trade-Offs to Know |
|---|---|---|
|
Concrete pavers |
Most residential patios; widest color and shape range |
Color can fade over years; sealant refreshes it |
|
Travertine |
Pool decks and Mediterranean architecture |
Natural stone varies in tone; needs sealing against stains |
|
Porcelain |
Contemporary homes; low water absorption |
Higher material cost; requires a precise base |
|
Clay brick |
Traditional and historic homes |
Softer surface; can chip under heavy furniture |
Paver Patterns, Colors, and Layouts That Work
Patterns worth considering:
- Running bond: classic, versatile, easy to repair
- Herringbone: strong interlock, good for high-traffic areas
- Basketweave: traditional look, works well on walkways
- Large-format modular: modern, fewer joints, cleaner lines
Pattern choice is not just aesthetic. Herringbone and other interlocking patterns distribute load better, which matters on patios hosting heavy furniture, planters, or pool traffic. A running bond is easier and cheaper to repair because a single paver can be lifted and reset without disturbing neighbors.
Permeable and Sustainable Paver Options
A growing share of homeowners ask about permeable pavers, and it’s a legitimate design choice rather than a niche one. Permeable systems use wider, open-graded joints and a crushed-stone base that stores water and lets it infiltrate instead of running off, reducing puddling, easing demand on yard drainage, and helping with local stormwater requirements on larger projects.
Connecting the Patio to the Rest of Your Outdoor Living Space
Think about how the patio connects to the rest of your outdoor living space. A fire pit, outdoor kitchen, or seating wall changes the layout, and planning those elements now avoids cutting into a finished patio later. A few rules of thumb:
- Leave at least 3 feet of clear walking space around a fire pit or seating group.
- Set an outdoor kitchen on a reinforced base, since appliances and counters add concentrated load.
- Align the patio edge with a major house line, a wall, a window, or the roofline, so the space reads as intentional.
- Plan lighting conduit and any gas or water stub-outs before the base goes down.
Base Preparation and Hardscape Drainage Solutions
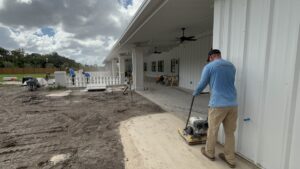
Base preparation is the single biggest factor separating a patio that lasts decades from one that shifts within a year. Excavation removes soil to the correct depth, then crushed stone is compacted in lifts, not dumped in one pass.
Hardscape crew using a plate compactor on a crushed stone base during paver patio installation
Excavation, Sub-Base Compaction, and Edge Restraint
Three details decide whether your base holds:
- Excavation depth. Too shallow, and there’s no room for a proper base.
- Sub-base compaction. Crushed stone compacted in layers reaches far higher density than a single thick pour.
- Edge restraint. A rigid border holds the field of pavers together and stops the outer row from spreading.
Skipping edge restraint is one of the most common shortcuts. Without it, the outer pavers creep outward season after season, joints open, and the whole field loosens.
If your property has tricky grading, this is the stage where a contractor should tell you honestly whether pavers are the right solution or whether grading needs to be addressed first.
Free consultation & estimate →
Paver Patio Installation Timeline: What Each Phase Looks Like
A typical residential patio takes several days to a couple of weeks depending on size, access, and weather. The paver patio installation timeline breaks into predictable phases, and knowing them helps you plan around the disruption.
|
Phase |
Typical Duration |
What You’ll See |
|---|---|---|
|
Site prep and excavation |
1-2 days |
Sod removed, soil hauled off |
|
Base installation |
1-3 days |
Crushed stone, compaction, grading |
|
Paver setting |
2-4 days |
Pattern laid, cuts made, edges restrained |
|
Joint sand and cleanup |
1 day |
Sand swept in, surface compacted, site cleared |
How to Add Lighting to Paver Driveways and Patios
Learning how to add lighting to paver driveways and patios is mostly a planning question, not an electrical one. Decide before the pavers go down, so conduit and fixtures can be set into the base rather than retrofitted later.
Options that work well:
- Low-voltage path lights along walkways and patio edges
- Step and wall lights on seating walls and risers
- Hardwired fixtures for driveways and larger features
Choosing a Licensed Contractor and Understanding the Warranty
A licensed contractor should show you their license, insurance, and a written warranty before you sign anything. Hardscape work touches permitting and zoning rules that vary by property, so ask who pulls required permits and confirms setbacks. This is where unlicensed or inexperienced crews get exposed.
When a Paver Patio Needs a Permit
Not every patio requires a permit, but many do, and the rules depend on your property and jurisdiction. As a general guide, expect permitting to come into play when a project involves:
- Structural elements such as a raised patio, retaining wall, or seating wall above a low height threshold
- Electrical or gas work for lighting, an outdoor kitchen, or a fire feature
- Grading changes that alter how water leaves your property or affects a neighbor
- Setbacks or easements where the patio would sit too close to a property line or utility
- Impervious surface limits in jurisdictions that cap how much of a lot can be covered by hardscape
What to Verify Before You Sign
What to check before hiring:
- Active state or local license and proof of insurance
- Written project scope with materials specified by brand and type
- A warranty that spells out what’s covered and for how long
- References from projects similar to yours
- Confirmation of who pulls permits and who handles inspections
Ask for the license number and verify it through the state or county licensing database rather than trusting a photocopy. Insurance matters too: general liability protects your property, and workers’ compensation protects the crew. If a contractor can’t produce a certificate of insurance, the risk of an on-site injury or property damage can land on you.
What a Real Warranty Covers
Warranties in this trade usually split into two parts: the manufacturer’s warranty on the pavers, and the contractor’s workmanship warranty on the installation. Read both.
- Manufacturer warranty typically covers defects in the paver material, such as cracking or excessive fading, and is usually prorated over time.
- Workmanship warranty covers how the patio was built, base compaction, drainage, edge restraint, and joint sand. This is the one that matters most, because most failures trace back to installation, not the paver.
Questions That Separate Serious Contractors from the Rest
A short list of questions tells you a lot about how a contractor operates:
- How deep will you excavate, and how many inches of compacted base will go under the pavers?
- Where will water exit the patio, and how will you confirm the slope?
- Do you use edge restraint on all open sides, and what type?
- Who pulls the permit if one is required?
- What does your workmanship warranty cover, and for how long?
Frequently Asked Questions
How long does a professional paver patio installation take?
Most residential paver patio installation projects take about one to three weeks from excavation to final joint sand, depending on square footage, site access, and weather. A small walkway may finish in a few days, while a large patio with an outdoor kitchen or fire pit runs longer. Base preparation and sub-base compaction often take as much time as laying the pavers, so a rushed schedule is a warning sign. Ask your contractor for a written paver patio installation timeline before work begins.
What maintenance is required to keep a paver patio looking new?
Plan on periodic paver cleaning with a broom or leaf blower, plus a rinse a few times a year. Re-sanding the joints every two to three years keeps interlocking pavers stable and blocks weeds. Sealing every three to five years helps color hold up under Florida sun and makes stains easier to remove. Fix any settled or shifting areas early, since a small dip can grow into a trip hazard. A licensed contractor can handle sealing and joint sand refresh as part of routine care.
How do I know the drainage planning will actually solve my patio problems?
Ask to see the grading plan before excavation starts. A proper hardscape drainage solutions approach accounts for the slope of your yard, roof runoff, and how water moves during heavy rain. It may include a slight pitch away from the house, channel drains, or permeable pavers in low spots. If your property has tricky grading, the contractor should walk the site with you and explain where water will go, not just sell you pavers.
What does a lifetime workmanship guarantee actually cover?
A workmanship guarantee covers how the patio was built, not the pavers themselves. If base preparation was done correctly, you should not see sinking, heaving, or widespread shifting years later. Ask the contractor to put the guarantee in writing and spell out what triggers a repair visit. Material defects are usually covered separately by the paver manufacturer. Get both the workmanship terms and the product warranty in your contract before signing.