
Table of Contents
- Crushed Stone for Paver Base: What Works and What Doesn’t
- Best Gravel for Paver Base: Material Selection and Gradation
- Paver Base Depth: How Deep Should Your Foundation Be
- Stone Dust Under Pavers: Bedding Layer Essentials
- How to Compact Paver Base: Installation Process and Verification
- Drainage, Slope, and Edge Restraint: Preventing Future Problems
- Common Installation Mistakes and How to Avoid Them
- Frequently Asked Questions
Last Updated: October 17, 2026
Crushed Stone for Paver Base: What Works and What Doesn’t
Can you use crushed stone for paver base? Yes, but not all crushed stone performs equally.
Crushed stone works as a paver base when it meets specific requirements: proper gradation, adequate compaction, and the right depth for your intended use.
This guide covers what crushed stone works best, how deep your base needs to be, and the step-by-step installation process, plus the common mistakes that undermine even the best materials.
Best Gravel for Paver Base: Material Selection and Gradation
The best base material for pavers isn’t just any crushed stone. It needs to compact firmly, lock together, and resist displacement under load. Crusher run (also called crusher dust or ¼ inch minus or 250 sand) is the industry standard because it combines larger aggregate pieces with fine dust particles that bind together when compacted.
Crusher run mixes larger pieces up to ¼ inch with smaller fragments and stone dust. When compacted, the dust fills voids between larger stones, creating a solid, stable base.
Crusher Run vs. Clean Gravel
Crusher run compacts into a solid foundation; clean gravel stays loose and unstable:
- Crusher run: Angular pieces lock together. Fine dust binds the layer. Compacts to 95% density or higher.
- Clean gravel: Rounded pieces roll and shift. No binding dust. Remains loose even after compaction.
Clean gravel alone lets pavers settle unevenly within months; crusher run prevents this with a rigid base layer.
Crushed Concrete and Crushed Limestone as Alternatives
Recycled crushed concrete works as a paver base and often costs less than fresh crusher run, compacting similarly because it contains dust and angular pieces.
Crushed limestone is another option, but it’s softer than granite-based crusher run and breaks down under heavy loads. It performs adequately for foot-traffic patios; for driveways or high-traffic areas, crusher run outperforms it.
Paver Base Depth: How Deep Should Your Foundation Be
Base depth follows from three inputs: what the surface will carry, what sits beneath it, and how water moves through the site. Get it wrong and no amount of compaction or premium aggregate will save the installation; get it right and the base can support pavers for decades.
Depth by Intended Load (in South Florida)
Use these compacted-depth ranges as a starting point for crusher run or equivalent well-graded aggregate:
- Walkways and lightly used paths: 2 inches compacted. Foot traffic only; no vehicle loading.
- Residential patios and courtyards: 2 – 3 inches compacted. The lower end works for stable, well-draining subgrade; the upper end is safer for heavier outdoor furniture, hot tubs, or occasional equipment.
- Residential driveways (cars and light trucks): 3 to 4 inches compacted. The upper end applies when the subgrade is weak or the driveway is long and heavily used.
These figures refer to compacted base thickness only, excluding the bedding layer and paver thickness above it.
Adjusting for Soil Conditions
The subgrade, native soil beneath the base, determines how much the base must compensate:
- Sandy or gravelly subgrade with good drainage: The lower end of the range is usually adequate; water passes through quickly and bearing capacity is decent.
- Silty or clay-heavy subgrade: Add 2 inches. These soils hold water, soften when wet, and compress under load.
- Expansive clay: Add 2 to 4 inches and consider a stabilized subbase; these clays swell when wet and shrink when dry.
Climate and Moisture Adjustments
In hot, humid climates with intense seasonal rainfall, drainage drives depth decisions. Where water stands on the subgrade after a storm, the base needs to be thicker, with positive slope and, in severe cases, subsurface drainage. If you’re unsure which condition applies to your site, a simple percolation test, digging a test hole, filling it with water, and observing drainage speed, tells you more than any generic chart.
Why Depth Is Not the Place to Economize
Undersized bases are the single most common cause of paver failure. A base 2 inches too shallow can mean settling, rocking, and joint sand loss within a few seasons, and repairs typically require removing and reinstalling the pavers, far more disruptive than building the correct depth from the start.
A Simple Depth Check Before You Build
Before ordering material, confirm three things: the intended load, the subgrade condition (dig a test hole and feel the soil), and the site’s drainage behavior after a heavy rain. Those answers map directly to a depth range above; if they point to the high end or beyond, bring in a professional rather than guess.
Stone Dust Under Pavers: Bedding Layer Essentials
After your compacted base is complete, add a 1-inch bedding layer of stone dust or fine sand directly under the pavers.
Stone dust works better than sand, which washes away over time, especially in areas with good drainage or seasonal moisture.
Spread stone dust evenly, then use a straightedge to strike off excess and create a consistent surface.
How to Compact Paver Base: Installation Process and Verification
Compaction turns loose crushed stone into a foundation. The material matters, but the sequence and verification matter just as much. Here’s the full process, excavation through final grade check, with the specifics that separate a base that lasts from one that fails.
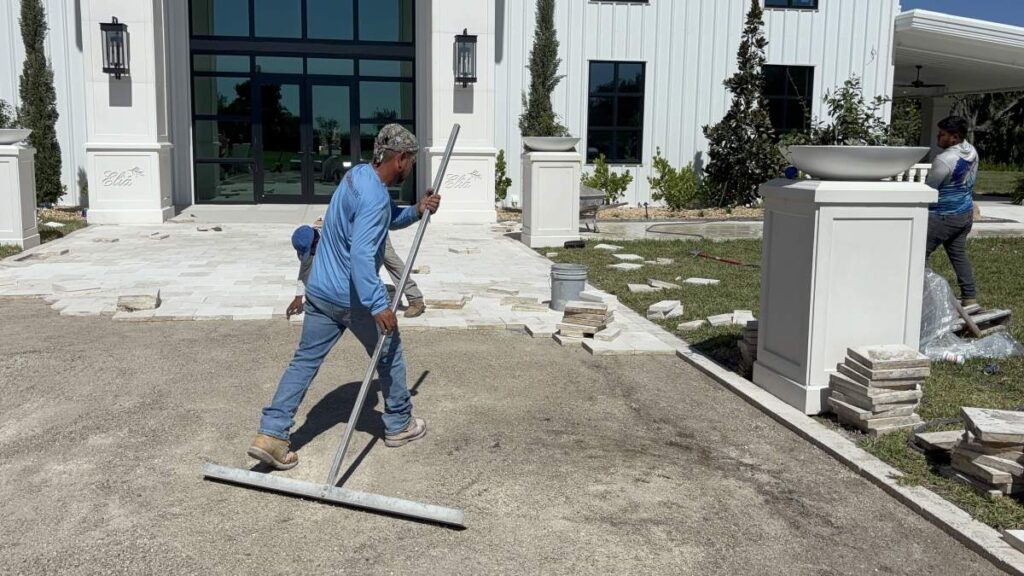 Diagram showing how to compact crushed stone for paver base using a plate compactor to ensure a stable installation.
Step 1: Excavate to the Correct Depth
Excavation depth equals paver thickness plus bedding layer plus compacted base depth. For a patio with 2.5 inch pavers, a 2.5~3 inch base, that’s 5 to 6 inches below the final paver surface. Excavate slightly wider than the paver field for edge restraint, and remove roots, organic material, and soft spots that will settle and undermine the base.
Step 2: Prepare and Compact the Subgrade
The native soil needs its own compaction pass before any aggregate goes down. Run the plate compactor over the excavated subgrade, then walk the area for soft spots. Any spot that deflects noticeably should be dug out and replaced with compacted aggregate. Easy to skip, expensive to regret.
Free consultation & estimate →
Step 3: Place and Compact the Base in Lifts
Spread the crusher run in lifts of 1 to 2 inches, never more. Thin lifts let the compactor’s energy reach the full depth; thick lifts leave loose material at the bottom that later settles. For each lift:
- Spread the aggregate evenly with a rake or lute.
- Run a plate compactor or vibratory roller over the area in overlapping passes.
- Make 4 to 6 passes per lift, depending on material density and equipment weight.
- Scrape and re-level high or low spots before the next lift.
- Repeat until the compacted base reaches target depth.
In dry conditions, mist lightly between passes, moisture helps fines bind, but saturated material won’t compact. Damp, not wet, is the target.
Step 4: Check Grade and Slope
After the final lift, check the surface with a straightedge and a level. The base should be flat within about ½ inch over 10 feet, with a consistent slope of roughly ¼ inch per foot away from structures. Minor undulations are acceptable because the bedding layer will accommodate them; inconsistent slope is not, because it determines where water goes.
Step 5: Verify Compaction
Walk the finished base; your footprint should leave little or no impression. If you sink more than about ¼ inch, add passes. Then drag a stiff broom or rake across the surface, loose, shifting material means under-compaction, while a firm, tight surface means the fines have locked in. For larger or load-bearing projects, a nuclear density gauge or dynamic cone penetrometer gives a quantitative reading, but the walk-and-broom checks catch most residential problems.
Step 6: Add the Bedding Layer and Set Pavers
Spread about 1 inch of stone dust or coarse sand over the compacted base, strike it off with a straightedge, and screed to a consistent thickness. Don’t compact the bedding layer before setting pavers, it’s meant to be loose enough to level them as they’re tapped into place. Set pavers on the screeded bed, check level and slope as you go, and compact the finished surface with a rubber-padded plate compactor once the field is complete.
Step 7: Install Edge Restraint and Joint Sand
Edge restraint along the perimeter keeps the paver field from spreading under load. Install it before or immediately after laying the field, anchored into the compacted base. Sweep joint sand into the joints, compact the surface again, and top off. This sequence locks the pavers together and completes the load-transfer system that begins with the compacted base.
Drainage, Slope, and Edge Restraint: Preventing Future Problems
Water management determines whether your paver installation lasts 5 years or 25 years. Proper drainage prevents erosion, settling, and weed growth through joints.
Create a gentle slope away from structures, typically ¼ inch per foot.
Edge restraint prevents pavers from spreading outward under load.
Consider subsurface drainage if your site has poor natural drainage.
Common Installation Mistakes and How to Avoid Them
Most paver base failures stem from a handful of recurring mistakes:
Insufficient base depth is the most common error. Homeowners cut corners to save money and end up with settling pavers within years.
Skipping compaction passes creates a loose, unstable foundation.
Ignoring drainage leads to water saturation and subgrade failure.
Inadequate bedding layer causes rocking pavers and trip hazards.
Avoiding these mistakes transforms a DIY project from likely failure to probable success.
Paver base preparation determines whether your installation lasts 5 years or 25 years.
Frequently Asked Questions
Can you use crushed stone for a paver base?
Yes, crushed stone is one of the most reliable materials for paver bases when properly selected and installed. The key is using the right type—typically 1/4 inch minus crusher run, which combines stone particles with fine dust that binds when compacted. This creates a stable, well-draining foundation that resists settling and supports paver weight effectively. Avoid using loose gravel or pea gravel alone, as these don’t compact and won’t provide adequate support.
What size crushed stone should you use under pavers?
Use 1/4 inch minus crusher run (also called modified stone) as your primary base layer. The 1/4-inch refers to the largest particle size, while ‘minus’ means the material contains particles smaller than that, down to dust. This gradation is critical—the mix of large and small pieces allows the material to compact tightly and create a unified, load-bearing surface. Avoid single-size gravel, which leaves voids and settles unevenly.
How deep should a crushed-stone paver base be?
For most residential patios and walkways, plan for 2~4 inches of compacted crushed stone base. For driveways or areas with heavier traffic, increase to 6 inches. Always excavate deeper than your final base depth to account for settling during compaction—typically 1-2 inches deeper than your target. The exact depth also depends on your soil type and site drainage; professional assessment ensures your base will remain stable long-term.
Should you use stone dust under pavers?
Yes, stone dust (also called limestone screenings or crusher dust) is essential as a bedding layer directly under pavers. Spread 1/2 to 1 inch of stone dust over your compacted crushed stone base, then level and lightly compact it. Stone dust fills small voids in the base and provides a smooth, even surface for pavers to sit on, preventing rocking and ensuring proper drainage. It’s different from the base layer and serves a specific leveling function.
Is crushed limestone a good paver base?
Crushed limestone can work as a paver base, but it’s less ideal than crusher run. Limestone is softer and breaks down more easily under compaction and traffic, especially in areas with heavy moisture. Crusher run (crushed granite or similar stone with dust binder) is more durable and compacts more uniformly. If you use crushed limestone, ensure it’s angular and contains fines, and monitor for settling over time.